급한 프로젝트 하나를 의뢰받았다. 의뢰의 내용은 캘린더 화면을 만들어달라는 것이었다.
기한이 적었기 때문에 만드는 것 보다 캘린더 오픈소스 라이브러리를 이용하기로 했다. 그 중에서도 커스텀이 상대적으로 쉬운 FSCalendar을 선택했다.
일단 podFile에 해당값을 추가해준다.
pod 'FSCalendar'cocoapod를 사용하는 방법은 여기를 참고한다.
https://itstudy-mary.tistory.com/403
ios] cocoapods으로 swift library 추가하기
(이전에 cocoapods이 없는 분들은 먼저 homebrew를 깔고, cocoapods를 설치해주세요.) (시작 전에 터미널에 코코아팟이 설치되어 있는지부터 확인합니다. pod --version 터미널을 열고, 프로젝트가 있는 폴더
itstudy-mary.tistory.com
이제 사용법을 알아보자.
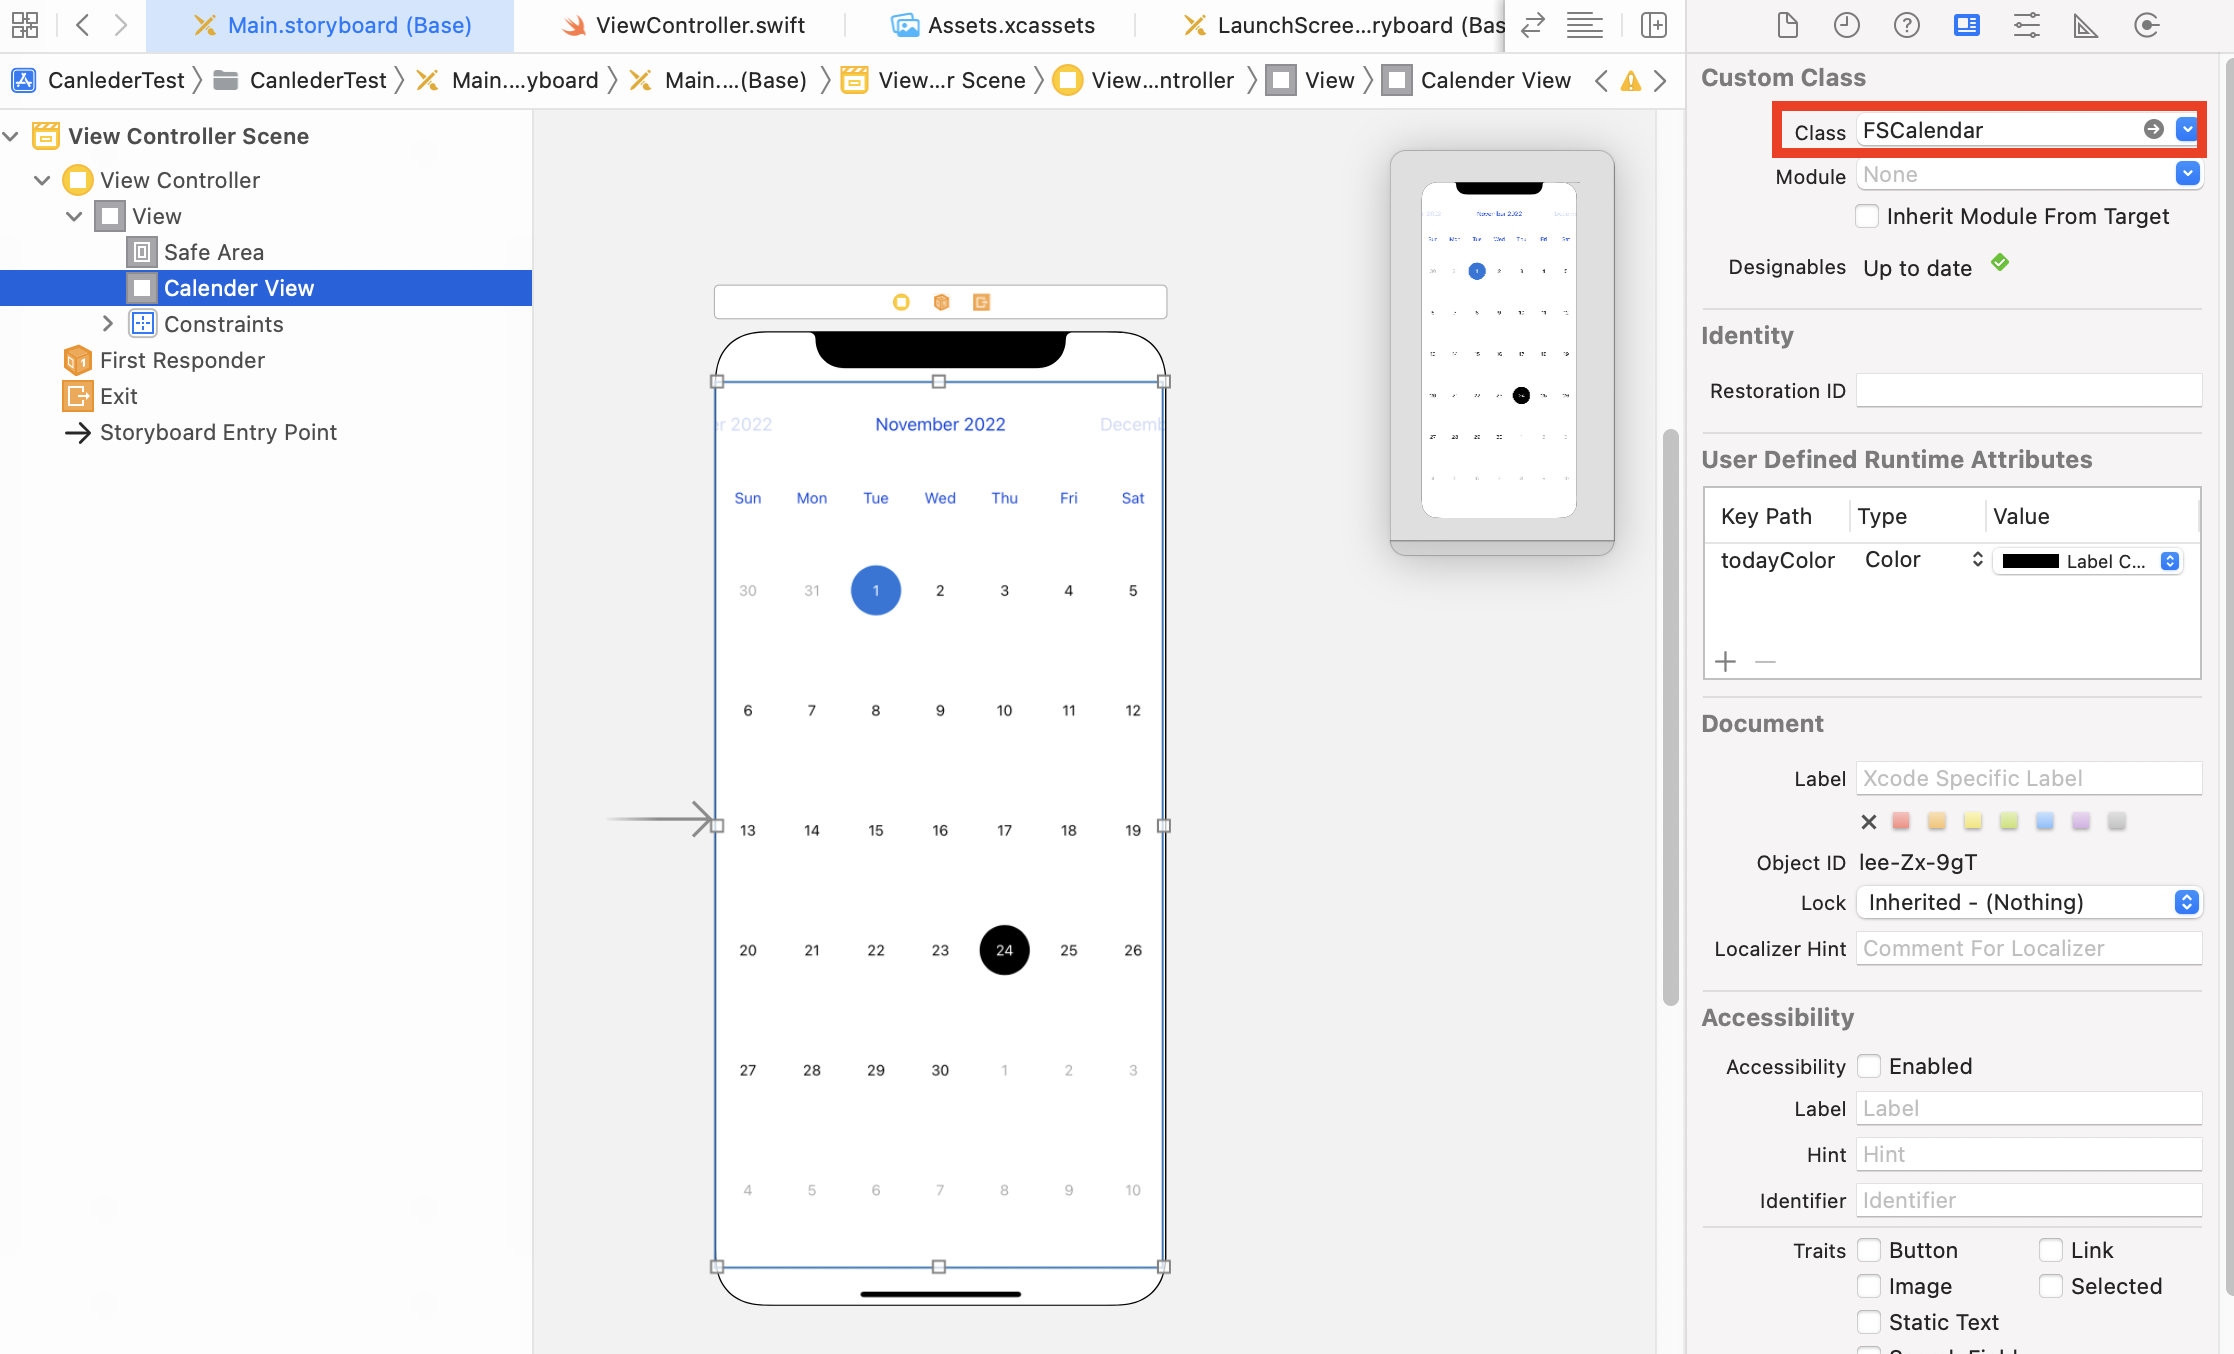
스토리보드에 UIView를 추가하고, 인스펙터에 Custom class에서 FSCalendar을 찾아서 추가해준다(왼쪽 빨간 네모). podfile을 정상적으로 작성하고 pod install을 정상적으로 했다면 클래스를 찾을 수 있을 것이다.
커스텀 클래스에 정상적으로 적용시켜 놓으면 UIView에 Designable을 통해 뷰가 보이게 된다.

또, Attribute Inspector을 통해 다양하게 커스텀이 가능하다.

그런데 인스펙터로는 동적으로 변화가 힘들기 때문에.. 코드에서도 해당 값들을 변경이 가능하다.
이제 캘린더뷰를 코드에서 제어해보자.
class ViewController: UIViewController, FSCalendarDelegate, FSCalendarDataSource {

    @IBOutlet var calenderView: FSCalendar!

    ...

    override func viewDidLoad() {
        super.viewDidLoad()
        // Do any additional setup after loading the view.
        initCalender()
    }

    func initCalender() {
        calenderView.delegate = self
        calenderView.dataSource = self

		...
    }

}
캘린더뷰를 선언하는 방식은 다음과 같다. 뷰의 스토리보드를 뷰컨트롤러와 연동해주고, delegate와 dataSource를 연동한다. 이제 캘린더를 커스텀할 준비가 됐다.
캘린더를 커스텀하는 방법 중, 내가 이용했던 것들은 다음과 같다.
이거보다 훨씬 많으니까 ^-^ ... 여기에 없는건 서치와 공식 깃허브()를 참조하도록 하자.
func initView() {
	...
        calenderView.locale = Locale(identifier: "en-US") // 주 영어로 표기
        // calenderView.locale = Locale(identifier: "ko_KR") // 주 한국어로 변경
        calenderView.appearance.caseOptions = FSCalendarCaseOptions.weekdayUsesSingleUpperCase // 영어로 할 시 주를 한 글씨로만 바꿔주기.

        calenderView.today = nil // 오늘 선택 없애기
        calenderView.scrollEnabled = false // 캘린더 스크롤
        calenderView.headerHeight = 0 // 헤더 없애기
        calenderView.placeholderType = .none // 달의 회색 날짜를 치우기
        calenderView.weekdayHeight = 15 // 월, 화, 수 .. 적힌 row 높이 조절
        calenderView.scope = .month // 달 형태 달력으로 할지, 주 형태 달력으로 할지 선택

        calenderView.appearance.weekdayFont = UIFont.systemFont(ofSize: 13) // 주 row 글씨 변경
        calenderView.appearance.titleFont = UIFont.systemFont(ofSize: 10) // 날짜 row 글씨 변경

	calenderView.appearance.imageOffset = CGPoint(x: 0, y: 10) // 이미지 좌표 변경
}
현재 캘린더에서 연도와 달을 가지고 오는 방법은 다음과 같다.
func getYearMonth() {

        let calendar = Calendar.current

        var currentPageMonth = calendar.component(.month, from: calenderView.currentPage)
        var currentPageYear = calendar.component(.year, from: calenderView.currentPage)

}
만약 기본 버튼이나 스와이프로 날짜를 넘기는 것이 아닌, 커스텀 버튼을 이용하고 싶다면 다음 방식을 이용하면 된다.
(필자는 클릭 리스너를 커스텀해서 쓰기 때문에 함수가 이렇지만, @IBAction 사용하시면 됩니다.)
    //날짜 뒤로 가기
    @objc private func onBack() {
        moveMonth(next: false)
    }

    //날짜 앞으로 가기
    @objc private func onNext() {
        moveMonth(next: true)
    }

    func moveMonth(next: Bool) {
        var dateComponents = DateComponents()
        dateComponents.month = next ? 1 : -1
        self.currentPage = calendar.date(byAdding: dateComponents, to: self.currentPage)!
        self.calenderView.setCurrentPage(self.currentPage, animated: true)
    }
날짜에 대한 클릭이벤트를 지원하는 매서드이다.
이 때, return true를 하면, 이 달력의 동그랗게 뙇. 찍히는 이벤트가 활성화 되고, return false를 하면 이벤트가 중지된다.
    func calendar(_ calendar: FSCalendar, shouldSelect date: Date, at monthPosition: FSCalendarMonthPosition) -> Bool {
            print(date)
            return false
    }
해당 날짜 아래에 이미지를 넣을 수 있는 방법은 다음과 같다.
    fileprivate let datesWithCat = ["20221115","20221120"]

    func calendar(_ calendar: FSCalendar, imageFor date: Date) -> UIImage? {

        let imageDateFormatter = DateFormatter()
        imageDateFormatter.dateFormat = "yyyyMMdd"
        let dateStr = imageDateFormatter.string(from: date)

	return datesWithCat.contains(dateStr) ? UIImage(name : "image_cat") : nil

    }
하지만 변경할 수 없는 것들도 많아서 다음에는 내가 직접 캘린더를 만들어보고 싶어졌다 ^-^

