리액트 네이티브는 유저 상호작용 이벤트가 많은 편이다. 또한 컴포넌트마다 제공되는 이벤트들도 조금씩 다르다. 그 중 많이 사용되는 이벤트를 본다
1. press
press는 웹의 onClick이벤트와 가장 유사한 이벤트이다.
Pressable 컴포넌트가 사용할 수 있는 이벤트 종류를 보자.
onPress = 터치(Long Press x)시 호출
onPressIn = 터치 시작시 호출
onPressOut = 터치 종료시 호출
onLongPress = 긴 터치 시 호출
로그로 이벤트 호출을 확인해보자.
-../component/EventButton.js
import React from "react";
import { Pressable,Text } from "react-native";

const EventButton = () => {
    const mOnPressIn = () => console.log('press in\n')
    const mOnLongPress = () => console.log('long press\n')
    const mOnPressOut = () => console.log('press out\n')
    const mOnPress = () => console.log('press\n')
    return (
        <Pressable
            style = {{
                backgroundColor : "#999999",
                padding : 16,
                margin : 10,
                borderRadius : 5,
            }}
            onPressIn = {mOnPressIn}
            onLongPress = {mOnLongPress}
            onPressOut = {mOnPressOut}
            onPress = {mOnPress}
            >
                <Text style={{color: 'white', fontSize : 24}}>Press</Text>
        </Pressable>
    );
}

export default EventButton;
-../src/App.js
import React from "react";
import { View, Text, Button } from "react-native";
import MyButton from "../component/myButton";
import Counter from "../component/Counter";
import EventButton from "../component/EventButton";

const App = () => {
    return (
        <View style={{
            flex: 1,
            backgroundColor: '#fff',
            alignItems: 'center',
            justifyContent: 'center',
          }}>
            <EventButton/>
          </View>
    );
}

export default App;
-../App.js
import App from './src/App'

export default App;
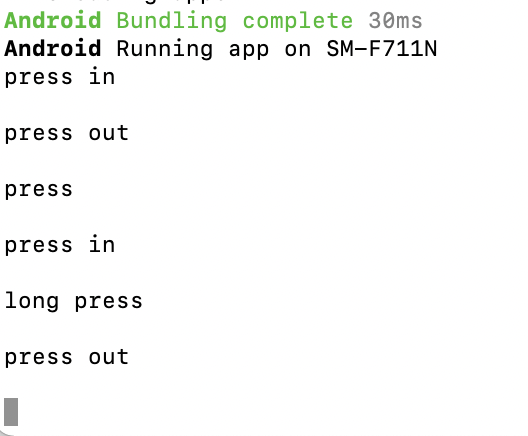
화면에 나온 Press 버튼을 클릭해보자.
터미널 로그에 뜨는걸 보자.

일반적인 클릭은 PressIn -> PressOut -> Press순으로 출력된다.
근데 엄청 빨리 클릭하면 PressIn -> Press -> PressOut 순으로 출력되기도 한다.
그리고 이것을 오래 누르고 있으면 Press가 노출되는게 아닌 Long Press가 노출되는데, PressIn -> LongPress -> PressOut 순으로 출력된다.
이 LongPress는 시간을 설정하는 것도 가능하다.
-../component/EventButton.js
<Pressable
            ...

            delayLongPress = {2000}
            >
                ...
        </Pressable>
delayLongPress로 버튼의 시간을 조절하는 것이 가능하다.
2. onChange
변화를 감지하는 이벤트로써 주로 TextInput에 자주 쓰면서 TextWatcher의 역할을 합니다.
-../component/InputEvent.js
mport React, { useState } from "react";
import {View, Text, TextInput} from "react-native";

const InputEvent = () => {
    const [text, setText] = useState('');
    const mOnChange = event => setText(event.nativeEvent.text);

    return (
        <View>
            <Text style = {{
                margin : 10, fontSize : 30
            }}>text : {text}</Text>
            <TextInput
                style = {{borderWidth : 1, padding : 10, fontSize : 20}}
                placeholder = "Enter Text"
                onChange = {mOnChange}>
            </TextInput>
        </View>
    );
}

export default InputEvent;
- ../src/App.js
import React from "react";
import { View, Text, Button } from "react-native";
import MyButton from "../component/myButton";
import Counter from "../component/Counter";
import EventButton from "../component/EventButton";

const App = () => {
    return (
        <View style={{
            flex: 1,
            backgroundColor: '#fff',
            alignItems: 'center',
            justifyContent: 'center',
          }}>
            <EventButton/>
          </View>
    );
}

export default App;


textWatcher처럼 InputText영역의 텍스트가 변화할 때 마다, 위의 텍스트 영역이 변화하는 것을 볼 수 있다.
이벤트는 이벤트를 선언할때 지정한 이벤트 이름의 인자로 다음과 같이 전달되므로,
"nativeEvent" : {
	"eventCount" :
    "target" :
    "text" :
}
event.eventNative.text 형태로 값을 참조합니다.
'Hybrid > React Native' 카테고리의 다른 글
| 리액트 네이티브] 7. 스타일 적용 (0) | 2021.10.07 |
|---|---|
| 리액트 네이티브, Github] 한 저장소에 여러개의 리액트 네이티브 프로젝트 커밋하기 (0) | 2021.10.06 |
| 리액트 네이티브] 5. state (0) | 2021.10.05 |
| 리액트 네이티브] 4. props (0) | 2021.10.05 |
| 리액트 네이티브 ] 3. 컴포넌트 (0) | 2021.10.02 |


